
What is the best way to hold a driver? The best way to hold a driver is by using a grip that feels natural, allows your hands to work together, and promotes a square clubface at impact. Many great golfers use slight variations, but the core principles of a solid golf swing grip remain the same.
A poor golf grip technique is a common source of inconsistency in amateur golf. Your grip is the only connection you have to the club. It sets the stage for everything else that happens in your swing. Getting this foundation right is key to hitting your driver farther and straighter. This guide will break down the essentials of the proper golf grip for your driver.
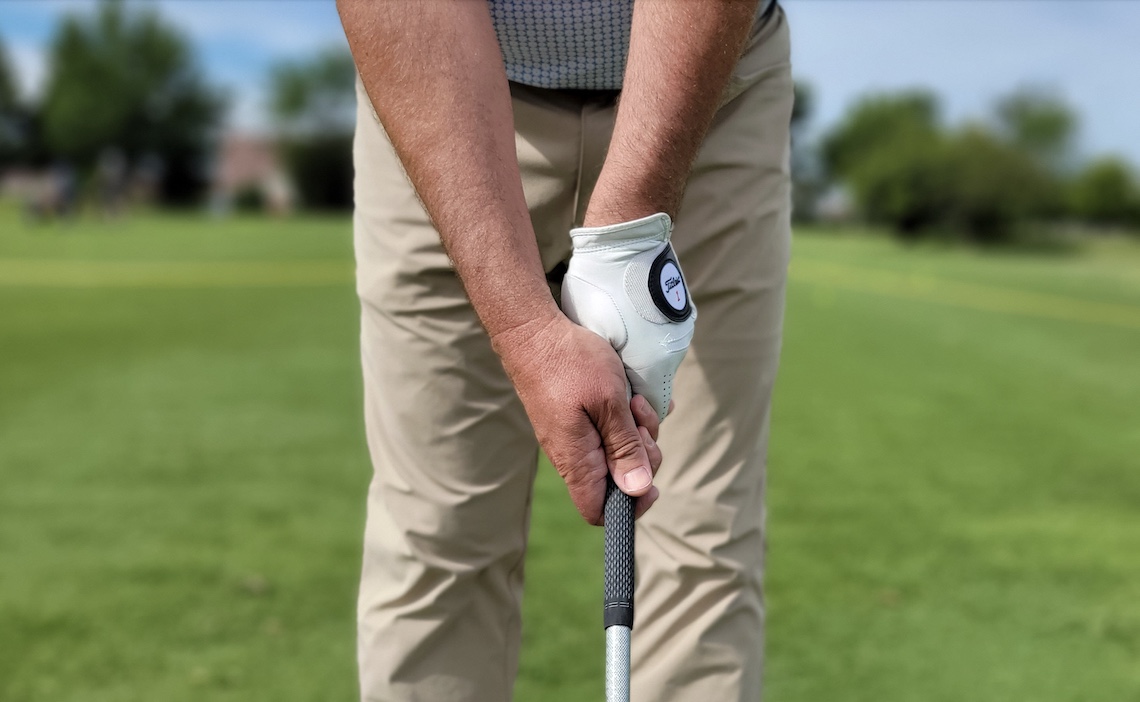
Image Source: usgolftv.com
Core Components of a Great Driver Grip
A good grip must balance control and release. Too tight, and you lose speed. Too loose, and you lose direction. We must find the sweet spot.
Establishing Hand Placement and Stance
Before you even think about the type of grip, your hands need to be positioned correctly on the club.
Hand Position on the Club
Your hands should fit comfortably on the grip. The heel pad of your lead hand (left hand for a right-handed golfer) should sit on top of the club. The lifeline of your trail hand should cover the thumb of your lead hand.
- Lead Hand: Should feel like it is gripping the top of the club. You want to see about two to three knuckles when you look down at your lead hand. This is crucial for a neutral golf grip.
- Trail Hand: This hand provides power and control. It should sit slightly lower on the grip than the lead hand. The heel pad of the trail hand should cover the lead thumb.
Grip Pressure: The Goldilocks Zone
Golf grip pressure is vital. Too much pressure restricts wrist hinge and kills clubhead speed. Too little pressure causes the club to slip or twist during the swing.
Think about gripping an egg or a tube of toothpaste. You want to hold it firmly enough so it doesn’t fall, but gently enough that you don’t crush it.
We often use a 1 to 10 scale for pressure, where 10 is a death grip. For your driver, aim for a pressure level between 4 and 6. This light pressure allows for maximum speed while keeping control.
Deciphering the Three Main Grip Styles
There are three main ways golfers connect their hands on the club. Choosing the right one affects face control. Many beginners ask which is the best way to hold a driver. The answer depends on your natural hand action.
The Vardon (Overlap Grip)
This is perhaps the most popular grip style among professionals.
- How it Works: The pinky finger of your trailing hand rests in the groove between the index finger and the middle finger of your lead hand.
- Feel: It keeps the hands close together, promoting a connected feel throughout the swing.
- Benefit: Many players find it helps square the clubface because the hands move more synchronously.
The Interlock Grip
This style is often favored by golfers with smaller hands or those needing extra security.
- How it Works: The pinky finger of the trailing hand hooks around the index finger of the lead hand, linking the two hands firmly.
- Benefit: It strongly promotes the hands acting as one unit. This can be great for golfers who tend to separate their hands too much.
- Consideration: Some players feel it restricts wrist hinge slightly.
The Ten-Finger (Baseball Grip)
This grip is common for golf grip for beginners.
- How it Works: Both hands are placed directly on the grip, with all ten fingers touching the club. There is no overlap or interlocking.
- Benefit: It creates a very wide, strong feeling in the hands. It is easy to learn quickly.
- Drawback: It can sometimes lead to a “flipping” action at impact because the hands can feel disconnected.
| Grip Style | Description | Best For | Potential Drawback |
|---|---|---|---|
| Interlock Grip | Pinky links with index finger. | Smaller hands, strong connection. | Can feel restrictive to some wrists. |
| Overlap Grip | Pinky rests on top of the index finger. | Most common, good synchronization. | Requires good hand coordination. |
| Ten-Finger Grip | All ten fingers touch the grip. | Beginners needing immediate stability. | Risk of hand flipping at impact. |
You should experiment with the interlock vs overlap grip to see which feels more natural for your swing. Consistency is more important than fashion here.
Critical Positioning: The Driver Grip Position
When hitting the driver, the driver grip position is slightly different than with irons. Because the driver is longer and you are trying to maximize distance, the grip must facilitate a shallower attack angle and rotation through impact.
The Neutral Grip Checkpoint
A neutral golf grip is the standard benchmark. This means the hands are positioned to allow the clubface to naturally square up at impact without excessive manipulation.
To check your neutrality:
- Place the club out in front of you, pointing straight ahead.
- Grip the club as you normally would.
- Look down at your lead hand (left hand for righties). You should see between two and three knuckles clearly.
- Your lead hand’s “V” (formed by the thumb and index finger) should point toward your right ear or slightly outside your right shoulder.
- The “V” on your trail hand should point toward your right ear or slightly outside your right shoulder as well.
If you see all four or five knuckles, your grip is too strong. This often leads to hooks. If you see zero or one knuckle, your grip is too weak. This often leads to slices.
Adjusting Golf Grip for the Driver vs. Irons
While the principles are similar, the driver requires subtle modifications due to the longer shaft and different swing plane.
Shaft Lean and Grip
With irons, you maintain shaft lean forward at address. With the driver, you want a shallower angle and more upright posture.
- Slightly Weaker Grip for Driver? Some players slightly weaken their driver grip compared to their irons. This can help prevent excessive rotation, which often causes pulls or hooks when swinging hard with the driver. A slightly weaker grip encourages the clubface to stay square or slightly open through impact.
- Longer Grip Length: Because the driver is the longest club, you might want your hands to sit slightly further down the grip than you do with a wedge. This effectively shortens the club slightly for better control, especially if you have long arms.
Grip Placement on the Hands
For the driver, ensure the grip is centered more in the fingers rather than deep in the palms for both hands. Gripping too deeply in the palms restricts wrist hinge, robbing you of potential distance.
- Fingertip Focus: Concentrate on holding the club primarily with your fingers. This allows the wrists to hinge freely on the backswing. This is a key aspect of achieving the proper golf grip for maximum power.
The Setup: Putting the Grip into Practice
Your grip is established before you even begin your backswing. Here is a step-by-step process for nailing your golf grip technique at address.
Step 1: Position the Club
Hold the club out in front of you, perpendicular to the ground. Keep your arms relaxed.
Step 2: Place the Lead Hand
Place the heel pad of your lead hand over the top of the grip. Then, wrap your fingers around the grip. Close your hand gently, ensuring you can still see those two or three knuckles. The grip should rest diagonally across the base of your fingers, not solely in your palm.
Step 3: Place the Trail Hand
Bring your trailing hand up. If using an overlap, place your pinky finger between the index and middle finger of the lead hand. If interlocking, wrap the pinky around the index finger.
The heel pad of your trail hand should cover your lead thumb comfortably. This connection ensures the power hand works in unison with the control hand.
Step 4: The Pressure Test
Squeeze lightly. Remember the 4 to 6 pressure scale. Practice making small wrist hinges (hinging up and down) while maintaining this pressure. If the club feels unstable, increase pressure slightly. If your forearms feel tense, ease up.
Step 5: Visual Confirmation
Step back and check your knuckles and the “V” alignment one last time. Ensure your grip is neither too strong nor too weak, aiming for that neutral golf grip.
Fine-Tuning Your Grip for Common Faults
Once you have the basics, you might need to make small adjusting golf grip based on your natural tendencies or common misses.
Correcting a Slice (Opening Clubface)
A slice usually happens because the clubface is open at impact. This is often caused by a weak grip or the trail hand dominating too early.
- Adjustment: Strengthen your grip slightly. Try to see four knuckles on your lead hand, or make sure the “V”s point slightly more inward towards your trail shoulder. This encourages the hands to rotate the face closed naturally.
Correcting a Hook (Closing Clubface)
A hook occurs when the clubface closes too aggressively or too early. This is often caused by a grip that is too strong.
- Adjustment: Weaken your grip slightly. Ensure you only see two knuckles, or even one and a half. Make sure the “V” on your lead hand points slightly more to the sky or slightly left of your left shoulder (for a right-hander).
The Role of the Trail Hand Thumb Placement
The placement of the trail hand thumb is crucial for controlling the face.
- Thin Thumb: Placing the trail thumb very high and narrow on the grip (a “thin” position) can make it harder to control face rotation, often leading to a slight fade or slices.
- Slightly Wider Thumb: A slightly wider placement, where the thumb rests more naturally down the side of the grip, generally gives better leverage and control for squaring the face. This supports the best way to hold a driver for power and control.
Drills for Solidifying Your Driver Grip
Theory is great, but practice makes permanent. Use these simple drills to ingrain the correct feeling of your golf swing grip.
The Towel Drill (Grip Connection)
This drill ensures your hands work together, simulating the connection felt in the interlock vs overlap grip.
- Place a small towel horizontally across your chest.
- Grip the driver normally, holding the towel firmly between your chest and the inside of both upper arms.
- Take slow half swings, focusing on keeping the towel pinched throughout the motion.
- If the towel drops, it means your hands separated or moved independently. This drill reinforces synchronization.
The Glove Drill (Pressure Management)
This drill addresses golf grip pressure.
- Take only your lead hand glove off, keeping the lead hand gloved.
- Grip the driver with the bare hand and the gloved hand.
- Make smooth swings. You will immediately feel if your bare hand is squeezing too hard, as the friction will be uncomfortable.
- This forces you to maintain a lighter, more sensitive grip pressure in the hand that needs to release energy.
The Wagon Wheel Drill (Neutral Face Awareness)
This drill helps confirm the driver grip position is neutral.
- Address the ball as normal.
- Make a very slow, three-quarter backswing, stopping when your lead arm is parallel to the ground.
- Examine the clubface. It should be pointed roughly towards the ground or slightly skyward, like the spokes of a wagon wheel pointing down.
- If the face is wide open (pointing toward the sky), your grip is too weak.
- If the face is shut (pointing towards the ground or closed), your grip is too strong.
- Repeat this feeling, making slow, controlled swings focusing only on maintaining that position through impact.
Gripping for Speed and Distance
Many golfers mistakenly believe a tighter grip equals more power. For the driver, this is the opposite of the truth. Distance comes from speed generated through leverage, which requires supple wrists.
Maximizing Wrist Hinge
Wrist hinge (or cocking) loads energy onto the shaft during the backswing. This loaded energy is released as speed at impact.
- If your golf grip technique is too tight, the muscles in your forearms lock up. This prevents the wrists from hinging fully.
- Focus on feeling lightness in your hands so that your wrists can hinge deeply and freely when taking the club back. This is why a slightly weaker grip can sometimes yield more distance—it reduces the tendency to restrict wrist movement.
The Importance of the Lead Side in Grip
For right-handed golfers, the lead side (left arm and hand) dictates the swing path and face angle. The grip on the lead hand must allow for smooth rotation.
If your lead hand is wrapped too far under the shaft (strong), you shut the face too early. If it is too far over the top (weak), you leave it open. The neutral golf grip allows the forearm to control the face angle through rotation, rather than relying solely on the fingers.
Troubleshooting Common Grip Issues for Beginners
For those just starting out, mastering the grip can be challenging. Here are solutions tailored to golf grip for beginners.
Issue: Hands Feel Awkward or Unnatural
Solution: Start with the ten-finger grip. Once you are consistently making solid contact, move to experimenting with the overlap or interlock. The initial goal is comfort and connection. A comfortable grip allows for a more natural swing path.
Issue: Wrist Pain or Forearm Fatigue
Solution: This almost always points to excessive golf grip pressure. Relax your grip. Try the toothpaste or egg analogy again. If your forearms are constantly tight, you are squeezing too hard. Consciously try to squeeze 20% less on your next shot.
Issue: Club Twisting in Transition
Solution: This means the grip connection is weak, or you are relying too much on one hand. Review the trail hand placement. Ensure the heel pad of the trail hand is covering the lead thumb properly. A good connection prevents the club from rotating uncontrollably through impact. Focus on holding the grip more toward the fingers than the palm.
FAQ Section
Q: Should I use the same grip for my driver and my irons?
A: Generally, yes, you should use the same grip style (interlock vs overlap grip). However, due to the difference in shaft length and swing plane, you might slightly adjust the positioning. Many players play a slightly weaker grip with the driver to combat the tendency to over-rotate and hook the ball. Consistency in style is key for muscle memory.
Q: How often should I check my grip?
A: You should check your grip before every shot, especially with the driver, as it is the longest club and slight adjustments matter more. Take a moment during your pre-shot routine to confirm your knuckle visibility and pressure level. Good golfers never stop checking their proper golf grip.
Q: What is the most common mistake in driver grip technique?
A: The most common mistake is gripping too tightly. High golf grip pressure restricts the wrist hinge, drastically reducing clubhead speed and distance potential. Amateurs often squeeze harder when they try to hit the ball farther, which has the opposite effect.
Q: Does the length of the grip affect how I should hold the driver?
A: Yes. If you have oversized grips or grips that are too long for your hands, it can force a weaker grip or cause excessive tension. If you find your grip feels too big, it may encourage you to use only your fingers, which limits power. Adjusting golf grip size might be necessary if standard fittings do not work well for you.
Q: What is the ideal grip for maximum control?
A: The neutral golf grip provides the best balance of control and power. It positions the hands so the clubface is naturally square at impact, requiring minimal active manipulation during the downswing to hit a straight shot.