
Yes, you can test golf cart batteries using a voltmeter, which is a simple and effective tool for checking battery charge level test and general battery health. A voltmeter, or a multimeter set to measure DC voltage, is the primary instrument for quick golf cart battery testing right from your cart or battery bank. This guide will show you exactly how to use this tool to keep your golf cart running smoothly.
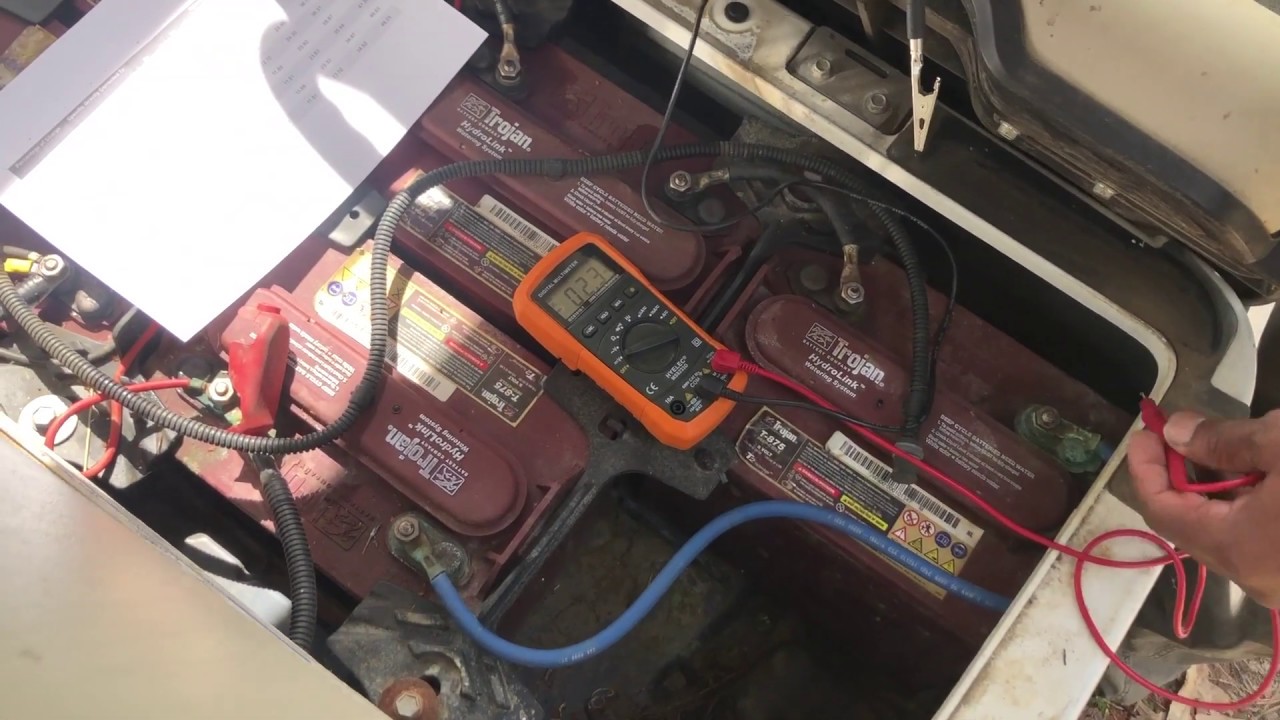
Image Source: i.ytimg.com
Why Checking Your Battery Voltage is Important
Your golf cart runs on electricity stored in its batteries. If the batteries are low or failing, your cart won’t go far or might not move at all. Regularly checking the voltmeter golf cart battery voltage tells you the state of charge. It also helps you catch small problems before they become big, expensive repairs. This is the first step in troubleshooting golf cart battery issues.
Gathering Your Tools for Accurate Testing
Before you start, you need the right tools. For golf cart battery testing, you will need:
- A Digital Multimeter (or Voltmeter): This device measures electrical pressure, or voltage. Make sure it can measure DC volts (Direct Current).
- Safety Gear: Always wear safety glasses and gloves. Battery acid can hurt your eyes and skin.
- Clean Rags: To wipe down the terminals if needed.
- A Chart: A simple reference chart to help with interpreting voltmeter readings golf cart.
Step-by-Step Guide to Testing Golf Cart Batteries with a Multimeter
Testing golf cart batteries with multimeter requires a few simple steps. Follow these carefully for the best results.
Setting Up Your Voltmeter Correctly
The most critical step is setting up your meter correctly. Incorrect settings can give you wrong readings or even damage your meter.
Selecting the Right Measurement Setting
- Turn the Dial: Locate the setting for DC Voltage. This is usually marked with a capital ‘V’ and a straight line or a ‘DCV’. Sometimes it’s shown as $\text{V} \overline{\text{–}}$.
- Choose the Range: Most golf cart batteries are 12-volt systems (or packs made of 12V batteries). You will be testing 6-volt, 8-volt, or 12-volt batteries individually. Set your meter to the 20-volt DC range. This range is high enough to read the battery but precise enough for good results.
Connecting the Leads
- Red Lead: Plug the red test lead into the jack marked ‘V’ (Voltage) or ‘Positive’ (+).
- Black Lead: Plug the black test lead into the jack marked ‘COM’ (Common) or ‘Negative’ (-).
Testing Individual Batteries in an 18-Volt System
Most golf carts use a series of batteries wired together to create the main system voltage (often 36V, 42V, or 48V). However, many modern carts or older systems also use a separate 12-volt battery for lights and accessories. If you are testing 12v golf cart batteries or checking the individual components of a larger pack, follow these steps.
Checking the Voltage of a Single Battery
- Locate the Terminals: Find the positive (+) and negative (-) posts on the battery you wish to test.
- Connect the Black Lead: Touch the tip of the black (COM) lead firmly to the negative (-) terminal of the battery.
- Connect the Red Lead: Touch the tip of the red (Voltage) lead firmly to the positive (+) terminal of the battery.
- Read the Display: Look at the screen of your multimeter. This is the battery’s current voltage reading.
Testing the Entire Golf Cart Battery Pack Voltage
If you want to know the total charge level of the entire system (e.g., a 48V system), you test the main output leads coming from the battery bank.
- Safety First: Ensure the cart is off and the keys are removed.
- Connect Leads: Place the black lead on the main negative (-) cable leaving the pack. Place the red lead on the main positive (+) cable leaving the pack.
- Read the Total Voltage: The reading tells you the pack’s total voltage, which reflects the overall golf cart battery charge level test.
Deciphering Voltmeter Readings Golf Cart: What the Numbers Mean
Once you have a reading, you need to know if it’s good or bad. This step is key to interpreting voltmeter readings golf cart. The required voltage depends on the battery’s nominal voltage (6V, 8V, or 12V).
Voltage Chart for Common Golf Cart Batteries (Resting Voltage)
This table is crucial for golf cart battery testing right after the batteries have rested for a few hours (not immediately after charging or use).
| Nominal Voltage | Fully Charged Voltage (Approx.) | Low Voltage Warning | Discharged Voltage (Needs Charging) |
|---|---|---|---|
| 6 Volt | 6.25V – 6.30V | Below 6.10V | Below 5.90V |
| 8 Volt | 8.33V – 8.40V | Below 8.15V | Below 7.90V |
| 12 Volt | 12.65V – 12.70V | Below 12.40V | Below 12.00V |
If you test a 48-volt system (which is six 8-volt batteries), a fully charged reading should be around 50.4 volts (6 x 8.4V). If you see 48 volts or less, the system needs a charge.
What Low Readings Indicate
If you see a voltage reading significantly lower than the “Fully Charged” column, it means one of two things:
- The battery simply needs to be charged.
- The battery is damaged and cannot hold a full charge anymore. This leads us to checking golf cart battery health.
Going Deeper: Checking Golf Cart Battery Health
A simple voltage check only tells you the state of charge. It doesn’t tell you if the battery can actually deliver power when needed. For a complete checking golf cart battery health, you need to perform a load test.
The Difference Between Open Circuit Voltage and Load Testing
- Open Circuit Voltage (OCV): This is what your voltmeter reads when the battery is sitting idle. This is easy to measure but not totally reliable for health.
- Load Test: This involves drawing significant current from the battery while measuring the voltage drop. A good battery maintains its voltage under load; a failing battery’s voltage will quickly plummet.
How to Perform a Basic Load Test with Your Voltmeter
While dedicated load testers are best, you can simulate a light load using your golf cart. This is essential for troubleshooting golf cart battery issues.
Load Testing Individual Batteries (For 6V, 8V, or 12V types)
- Charge Fully: Ensure the battery is fully charged first.
- Connect Voltmeter: Connect your voltmeter leads as described before.
- Apply a Load: Have an assistant turn on a high-draw accessory powered by that specific battery (like the headlights, if testing a 12V accessory battery). If testing an 8V or 6V drive battery, this is harder to isolate without disconnecting cables.
- Observe Voltage Drop: Watch the voltmeter reading while the load is applied for about 10-15 seconds.
- Good Battery: The voltage may drop slightly (maybe 0.2V or less) but should recover quickly once the load is removed.
- Bad Battery: If the voltage drops significantly (e.g., more than 0.5V) and stays low while the load is on, the battery is weak.
Load Testing the Whole Pack
This is the easiest way to test the overall system health.
- Drive the Cart: Drive the cart up a small hill or apply heavy throttle in the forward direction.
- Measure Voltage: Have an assistant measure the total pack voltage while the cart is actively pulling a load.
- Compare Readings: A healthy 48V system might dip down to 47V under a hard pull. If the voltage drops below 45V while driving under load, the pack has capacity issues.
Note on Load Testing Golf Cart Batteries: For serious diagnosis, especially with deep-cycle batteries, professionals use a specific load tester that draws a predetermined amperage (e.g., half the battery’s Amp-Hour rating for 10 seconds). If you are not comfortable disconnecting cables, stick to the OCV and the “driving load test.”
Advanced Techniques: Specific Focus on 12V Systems
Many modern carts use a 12V system for lights, or older carts might run entirely on a single 12V battery. Testing 12v golf cart batteries follows the same principles but the benchmarks are simpler.
A 12V deep-cycle battery should read 12.6V or higher when fully charged. If you consistently see readings below 12.4V even after allowing time for charging, the battery sulfate buildup may be too severe, indicating poor checking golf cart battery health.
Proper Voltmeter Usage for Carts: Best Practices
Proper voltmeter usage for golf carts ensures safety and accuracy every time you test.
Maintaining Clean Connections
Corrosion (a white or blue powdery substance) on the battery posts increases resistance. High resistance leads to inaccurate voltage readings and poor battery performance.
- Cleaning: If you see corrosion, disconnect the cables (always disconnect negative first!), clean the posts and cable clamps with a wire brush and a mixture of baking soda and water. Rinse well and dry completely before reconnecting.
Checking Battery Water Levels (If Applicable)
For flooded lead-acid batteries (not AGM or Gel), you must check the electrolyte levels.
- Safety: Wear gloves and eye protection.
- Open Caps: Carefully remove the cell caps.
- Inspect Level: The water level must cover the lead plates inside. If it is low, add only distilled water until the plates are covered. Do not add acid.
If you find that one cell in a 6V or 8V battery remains significantly lower in voltage than the others, that specific cell is likely dead or shorted. This means the entire battery unit needs replacement, even if other golf cart battery testing methods seem okay.
Troubleshooting Golf Cart Battery Issues Using Voltage Data
Your voltmeter readings are your best guide for troubleshooting golf cart battery issues.
| Symptom | Voltmeter Reading Indication | Next Step |
|---|---|---|
| Cart won’t move, pack reads 30V (on a 48V system) | Severely discharged or broken connection. | Check all cables for tightness and corrosion. Try charging immediately. |
| Pack reads 50V fully charged, but cart runs only a short distance. | Low capacity in one or more batteries. | Perform individual battery OCV and basic load tests. |
| Batteries never reach full charge voltage (e.g., always stops at 49V on 48V system). | Battery charger may be faulty, or one battery is deeply sulfated and pulling the pack down. | Check charger output voltage. If charger is good, focus on the lowest reading battery. |
| One 8V battery reads 7.2V while others read 8.3V. | This battery is significantly weaker than the rest. | Replace the single weak battery if possible, or replace the entire set. |
Maintaining Optimal Battery Charge Levels
The best way to keep your readings consistent is through good maintenance. Never let your batteries sit in a discharged state for long periods.
- Charging: Use a high-quality, automatic golf cart charger. These chargers stop charging when the correct voltage is reached, preventing overcharging which damages plates and causes excessive water loss.
- Seasonal Use: If your cart sits unused for more than a month, put it on a “trickle charger” or “battery tender.” This keeps the golf cart battery charge level test reading at peak health (around 12.6V for a 12V battery) without overcharging.
Comprehending Battery Pack Configurations
Most golf carts use series wiring to achieve high voltage:
- 36-Volt System: Six 6-volt batteries wired in series.
- 48-Volt System: Four 12-volt batteries OR six 8-volt batteries wired in series.
When testing golf cart batteries with multimeter, remember that the final pack voltage must be the sum of the individual cell voltages. If you are testing a 48V system made of six 8V batteries, and one reads 7.5V, the total pack voltage will be noticeably lower than 50.4V, even if the charger tries to push it up.
Why Professional Load Testing Matters
While a voltmeter is excellent for quick checks and golf cart battery charge level test, it has limits. A specialized load tester draws a measured, high amperage load for a set time, usually 15 seconds. This test drains the battery quickly enough to expose internal resistance issues that simple testing golf cart batteries with multimeter might miss.
If your OCV is perfect (e.g., 12.7V) but the cart dies quickly under load, you need that professional diagnosis. Load testing confirms the battery’s reserve capacity—how much usable energy it truly holds.
Frequently Asked Questions (FAQ)
Q: Can I test my golf cart batteries while they are still connected to the charger?
A: It is best not to. Testing while charging gives you the “surface charge” reading, which is artificially high. For the most accurate golf cart battery testing, turn the charger off, let the batteries rest for at least 2-4 hours, and then check the OCV.
Q: What is considered a “dead” battery in a 48V system based on voltage?
A: A 48V system is dead or critically low if the total voltage drops below 46.8V (which means the average per 8V battery is below 7.8V). If an individual 8V battery reads below 7.5V resting, it is likely damaged beyond simple recharging.
Q: What is the best range setting on my multimeter for testing 12v golf cart batteries?
A: Set your multimeter to the 20V DC range. This allows you to accurately read voltages between 12V and 13V with good precision.
Q: Should I test batteries wet or dry (with the caps on or off)?
A: For standard flooded batteries, testing the OCV can be done with the caps on, but if the voltage is low, you should remove the caps to check water levels and inspect the plates before attempting to recharge. Always use the voltmeter probes directly on the metal terminals for the best contact.